Thursday, December 28, 2006

Mittens for Me


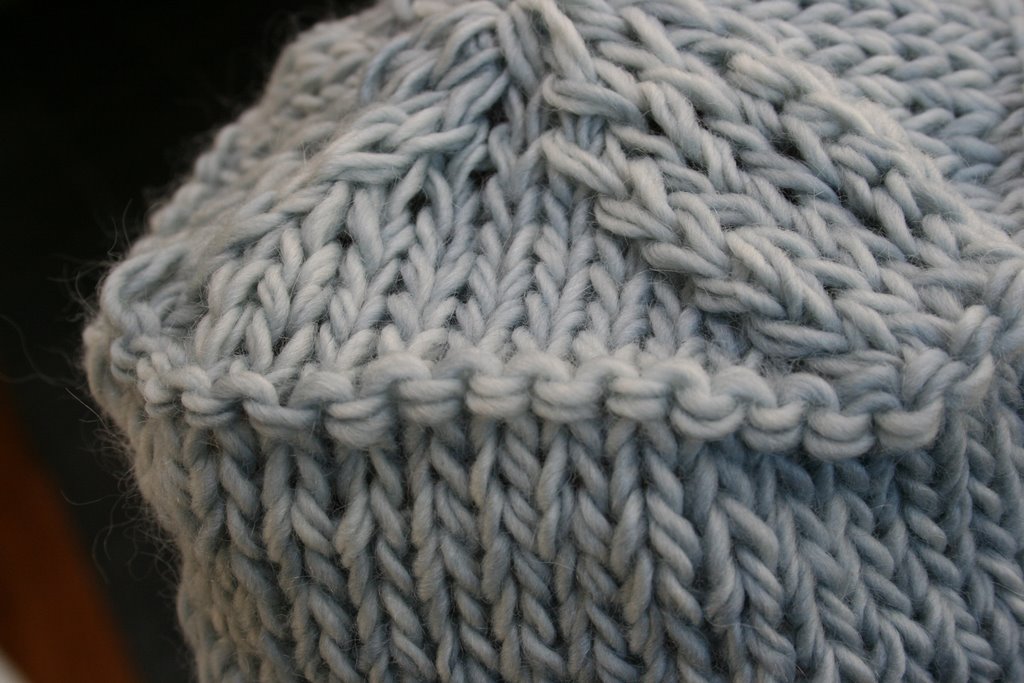
The holiday knitting is done, and nothing's on the needles except a big project I can't face right now. What could be better than a little somethin-somethin for myself? I love these Kureyon mittens for their asymmetrical coloring!

These are a fingertip-to-cuff, afterthought thumb mitten inspired by this pattern at Just Jussi using a skein of Noro Kureyon in colorway 170, with a bit of a coordinating yarn for the cuff (Lamb's Pride Worsted in a charcoal gray, left over from a Felted Wine Cozy. ) I'd seen these a while back and forgotten where, so I reinvented the wheel from the top down, trying the mitten on as I went for a good fit. (PS I have to remember to bookmark more often.)

I used dpns in size 6 for the body and 5 for the cuff, with a gauge on the body of 4.5 sts/in.

Using a crocheted provisional cast-on (which I learned how to do just for this! See tutorial here.) cast on 16 sts and join for working in the round. Distribute needles like this: needle 1: 8 sts. needle 2: 4 sts. needle 3: 4 sts.

Knit one round plain.
Increase round:
Needle 1: k1, m1, knit to last st, m1, k1.
Needle 2: k1, m1, knit to end.
Needle 3: knit to last st, m1, k1. This increases 4 sts every time you do it.

Continue to repeat these last two rows (knit one round plain, then do an increase round) until your mitten is the proper width (you can try it on over your fingers to check!).
The mittens pictured here (I have small hands in length but not in width) went up to 32 sts.

Needle 1: has 16 sts
Needle 2: has 8 sts
Needle 3: has 8 sts

Or, you can place a marker at the beginning of the round and knit however many sts you'd like on each needle - whatever!

Knit until the piece fits you, from the top of your fingers to the inside "corner" of your thumb. This turned out to be 4.5" for me.

Left Mitten:
Using a contrasting scrap of waste yarn, knit the first 5 sts of the round.
Slip these sts back onto the left needle, and knit them again using the working yarn.

Right Mitten:
On the first needle, knit to the last five sts (you've just knit 11 sts of this round) and knit these five sts with a contrasting scrap of waste yarn.
Slip these sts back onto the left needle, and knit them again using the working yarn.


Continue to knit until the body of the mitten is long enough to reach your wrist nicely. For me, this turned out to be about 8".


If you've got small wrists, do a round of decreases, otherwise go straight to the cuff:

Needle 1: k1, k2tog, knit to last three sts on needle, SSK, k1
Needle 2: k1, k2 tog, knit to end of needle
Needle 3: knit to last three sts on needle, SSK, k1

Break the yarn, switch to the smaller needles and join your contrasting color for the cuff. If you don't want the contrasting color purl bumps to show, knit one round plain in the new color; I kind of liked the punctuation of the bumps so I went straight into the ribbing.

Knit k2 p2 ribbing, for as long as you want it. I didn't want mine folded over, so I stopped after 2 inches or so.

Bind off using the sewn bind-off method (pictures here ) or, in pattern, or however you'd like, keeping in mind you have to shove your hand through whatever opening you're left with, so make it stretchy!

Now for the thumbs!! Go back to the waste yarn and pick it out. You'll have nine live sts. Place them on the larger needles, and knit one round, picking up two sts at each end of the thumbhole. Knit until your thumb is the length you need it, trying your mitten on as you go.

Once you've got the length about where you want it, try on the thumb once more - where the pad of your thumb is, right in the middle, k2tog to shap the tip of the thumb a bit. This isn't necessary, but it'll look a little less cumbersome.

Knit one more round, break your yarn and draw it through the remaining sts. When you finish your ends off, you can use the tails to close up any gaps in the thumb's base or at the opening at the very tip.

For the fingertip edge, remove the crocheted waste yarn and kitchener stitch those 16 live sts together (tutorial here).

Weave in your ends, and there you go! Mittens for yourself - you deserve them.

Keep Your Wine Cozy


Here in this temperate clime, what better use for thick wool than a cozy that will keep your wine cool at the beach? These wine cozies turned out to be fast, fabulous gifts that'll keep your white wine cool and your red wine cozy.

You'll need some Lamb's Pride Bulky, or other wooly yarn that'll knit to the same approximate guage. This is a good project for using up scraps, too. The charcoal gray cozy pictured here is made with a double strand of Lamb's Pride Worsted, but it felted up to a thinner fabric in the end product than the bulky - still perfectly fine, though. Choose your own color scheme - I had in mind the balmy days of, oh, November of aught-six here in San Diego, but any others will be just lovely, I'm sure.


Yarn: Lamb's Pride Bulky - partial skeins in as many colors as you want.
Needles: Size 13 dp, or size to give you proper guage
Gauge: 2.5 sts/in (approximately - not critical!)

With your main color, cast on 8 sts and join for working in the round, being careful not to twist.

First, knit the base:
k 1 round.
*k1, m1, repeat from * to end. 16 sts.
k 1 round.
*k2, m1, repeat from * to end. 24 sts.
k 1 round.
*k3, m1, repeat from * to end. 32 sts.
k 1 round.
*k4, m1, repeat from * to end. 40 sts.
k 1 round.

Now turn the corner:
purl 2 rounds.

Now head up the sides:
knit, knit, knit, changing colors when the mood strikes you.
Continue until the sides measure about 10.5" from the purl ridge to the top, and bind off.

Weave in ends, and felt! Check your work from time to time, opening up the inside to keep it from fusing together and pulling it into the approximate shape you need. As you get closer, have a bottle of wine on hand to test the fit.

Once it's wine bottle size, pull it onto a bottle and yank it into shape (a little snug is good - it'll be perfect when done blocking). Leave it until the sides are dry, then remove the bottle and turn the cozy over to let the bottom finish drying.

Voila!


PS I'm entering these in the Whiplash competition for gifts! Update: I won!


Copyright 2006 Lydia McNeil - You may not use this pattern for profit or reproduce it for profit; you may use it to knit for yourself, for others, or most certainly for charity, but not to sell.

Tuesday, December 26, 2006

Christmas Knitting Frenzy!


Whew....I turned my computer on for the first time today in almost a week! The frenzied knitting is done, the gifts given, and new projects are on the horizon.

Santa brought me a beautiful wooden swift and some incredible Malabrigo wool (every bit as soft as everyone has said) in a burnt orange color - you can smell pumpkin pie and chestnuts roasting just looking at it. I also got a silk needle case for my circular needles, so no more tangles for me.

You can see above our manufactured white Christmas, La Jolla-style (note the felted wine cozy - pattern to be posted soon!), snow courtesy of batting and double-stick tape. It was downright hot yesterday, especially with the ovens going all day in preparation for Christmas dinner. The menu was heavenly - roast pork with pancetta, corn gratin, pureed carrots, haricots vertes with roasted fennel and shallots, and roasted potato fans on a bed of leeks and onions, proving once again that bacon and heavy cream are foods of the gods - and was topped off by the most unbelievable flourless chocolate cake (Warning: do not serve without easy access to lifesaving equipment - this cake almost put as all under the table. At the very least, proceed with caution after ingesting the aforementioned bacon and heavy cream.)

We are off to the movies today, but I will try to post the wine cozy pattern later! I hope everyone had a wonderful holiday!

Monday, December 18, 2006

Poinsettia Hot Mitt


Recipe for a Poinsettia Hot Mitt - Serves one.

Knit one gigantic mitten, pattern here.


Add one poinsettia with berries (I know it looks like a starfish with an anotomical anomaly, but it's a pre-felted poinsettia. Really. And I'm sorry I put that image into your head at this most joyous of seasons.)


Add hot water.
Add detergent.
Add jeans.

And like the song says, shake it like a polaroid picture.

I used Lamb's Pride worsted on all of it, on size 9 needles. For the poinsettia, here's what you do:

CO 3 sts.
Knit one row.
Purl one row.
k1, m1, k2
Purl
Continue like this, increasing after the first stitch on the knit rows, until it's as wide as you want it (8 - 11 sts). Knit for a while plain, until it's as long as you want (1.5 - 3").

Then reverse the whole process to decrease:
On the knit rows, k1, k2tog, k to end.
Purl the purl rows even.
Stop when you have three sts on the needle, break the yarn and draw through the three live sts to bind off.
Weave in ends. You can leave the tails from the cast-on edge out and use them later to sew the flower together, although you really only probably need one of them left out.

I made five of these, all the same.....you could make more, varying sizes and shades of red and all, but I was in a holiday hurry. Maybe you are Rudolph relaxed....but if so, keep it to yourself. Nobody likes a gloater.

Now you need the little balls.
CO one stitch, and make a bobble by knitting into the front and back of this stitch until you have five stitches altogether.
Purl across all five stitches.
On the next row, k2tog, k2tog, k1. You have 3 sts now.
Purl the three sts.
K3tog. You have 1 st.
Break the yarn and pass it through the one stitch, and then use this tail to make a little drawstring purse out of your bobble (i.e. weave the tail through your knitting around the edge and then pull it together to close the underneath side of the bobble.)
And you know that other tail, from the cast-on edge? Stuff it into the bobble for body.

Sew your poinsettia together, and felt it with the gigantic mitten.

This took three cycles of hot/cold through the wash; very little happened during the 2nd cycle, so all the shrinking really happened during cycles 1 and 3. I always have a moment of panic when I think I'm going to end up with, well, gigantic models of real-life items that I'm going to have to display as art because they will be entirely nonfunctional. But shrink they eventually will, and, hopefully, we end up with something like this:

Friday, December 15, 2006

Seeing Red!


I'm not a big sock knitter. I live in flip-flop country. But sometimes.....I get a hankering to knit socks. Plus I had to cast on a stranded project to stay involved with a KAL I belong to. (This was before I knitted the Christmas ball in yesterday's post, which I'm definitely counting - it's stranded, right?)

I had some Cascade superwash left over from the infamous off-center placket sweater and some random lighter-colored worsted in my stash. I cast on for a toe up sock (my favorite!) using the method where you knit into the backs of your cast-on sts to start. I fooled with graph paper until I came up with this scrolly pattern (don't ask me why it's showing up BLUE either - that's not how the image looks here!):


I knit in a tube until I got to the heel, and then - disaster. I had to put the whole thing down for two weeks to allow the swelling in my brain to subside, because figuring out how the !@#$ to put in a heel on a stranded project almost made it explode.

First I tried a heel flap, which I frogged no less than three times while I alternately figured out I'd wreck the instep pattern when doing the gusset decreases and then convinced myself it was all in my mind.

Then I decided to use waste yarn - I've seen it done - and an afterthough heel. But wouldn't that wreck the pattern on the back of the sock? Which I realize now is actually on the bottom of your foot, so who cares?

And finally I decided to do the unthinkable. For me, anyway:


SNIP! I cut the stitch you see above, right in the middle of the heel. I unraveled (or is it "raveled"? I can never decide....) to both sides. I figured out I had to cut the contrasting color. I unraveled that too. I picked up an appropriate number of sts, and knit a "toe" like Elizabeth Zimmerman told me to.

I weaved in, I blocked on a hanger (which was easier said than done, bending that hanger into a foot-like shape).


The heel looked pretty good while blocking!


I tried it on Mary's foot - cuz it's for her. My guage for some reason tightened up between the casting-on honeymoon phase and the heel phase (repressed heel rage, anyone?) so it was a little hard to get on, but once on it looked, well, custom-made for her!!

And then I saw this:


Yep, that's a renegade stitch, laddering away from the heel as fast as it can. I'm about ready to burn this sock. I don't know how Patty can sleep through it.

Thursday, December 14, 2006

Purely Ornamental


I'm frantically trying to knit as many little gifts as possible while still keeping the plates spinning here. Everyone on my list is getting something handmade, whether they like it or not. The big girls have already gotten their fuzzyfeet, and they've been the recipients of a ton of wooly things all year.

DD#3 will get something....I'm working on a pair of socks for her but having finished one I'm waiting to see how it blocks out before getting too excited about the second one.

Other people will be getting ornaments. I took inspiration from Handknit Holidays, and knitted these balls up from scraps of yarn. The icy blue one (recognize the felted box yarn?) has a band of seed stitch around the middle - it's pretty subtle.

The deep red & white one is in my niece's school colors. With this one, I varied the recipe. I started with fewer sts on the needle, then took it up to a circumference of 60 sts, at which point I added the color work. I knitted one round plain before and after starting the pattern, and then used a charted snowflake that would yield a 12 st repetition around the middle and was about 9 sts tall - perfect for the guage.

Monday, December 11, 2006

Decking the Halls


See that up above? That's what I've been doing for two days straight instead of knitting. That's about half of Elftown, and about 2% of the Christmas encrustation that's taken over my house. We've decorated every surface this year...even the little greenhouse, aka the backdrop for many of my knitting photos.


See through the window there? Those are tangerine and orange trees in pots back there....can you tell I live in a geographical location that necessitates many, many woolen items to get through the tough winters? Please don't hate me, those of you shoveling out your driveways. Tomorrow I'll take a picture of the fake snow adorning our courtyard....it was a real beeyotch to make it stick.

I did manage to throw my latest pair of Fuzzyfeet into the wash though - and was really lucky to check them about 10 minutes into the hot cycle - they were already done!! The pink Lamb's Pride took the whole 30 minute cycle. The greenies are for DD#2, whose feet are narrow...I made these with 4 sts less in the circumference, and they turned out just right.

I have some pink Lamb's Pride left over from the first pair, and I'm thinking of making a pair for my 8yo with that....I'll have to think about how to make them much smaller now, as well as much narrower. If I'd been thinking I'd have measured the unfelted pair really well to figure out what the percentage of shrinkage was, but it's making my brain hurt to consider it even now.


In other knitting news, I'm about half done with a two-color stranded sock, half done with a cabled pocketed shawl, half done with a pair of Knucks, completely done with another pair of Knucks that just need finishing and embroidery, and seriously contemplating casting on for something totally different, just because I've got naked needles in my bag and stash galore. And even though I have no time.

Sunday, December 10, 2006

Knitting as Philanthropy


It's that time of year again - our National Charity League group gets together to knit for those in need. If you don't know, NCL is a mother/daughter philanthropic organization for girls in grades 7 - 12. We do service work all year, but every December we get together and do a bunch of hands-on projects at one of our meetings, including knitting scarves for whichever group we pick that year. This year we're donating our scarves to St. Vincent de Paul and also to the Salvation Army here in San Diego.

But guess what? Not everyone knows how to knit!! I know it's hard to believe for all of you - since I assume if you're reading a knitblog you - hello!! - knit too. So a large portion of that December meeting is devoted to TWK (Those Who Know) casting on for FAKs (Future Avid Knitters).

DD#2, the Lobster Sweater designer, managed to knit two scarves AT THE MEETING. That girl's needles are on fire - I can only wish I knit that fast. DD#1, a non-knitter for the most part (except for Batman hats), is starting to be converted - she has a good start on a scarf that should be done without too much delay. DN#3 (Dear niece) knits really fast this year and was almost done with hers....too bad finals are around the corner for all three of them or they'd be sitting pretty.

Wait till next month, when I post a photo of the finished scarves - knit by 200 people, some of whom will emerge with a real love of fiber by the end. In the meantime, there was an awful lot of this, knit up on the biggest needles people could find:

Thursday, December 07, 2006

I'm Not So Sure....


....that I like how this turned out. As you see above, I literally blocked (and tracked) my felted box. I wasn't using instructions so looking back I wonder if I should've done something at the four corners as I knit every row, so that they'd form a good 90 degree angle. I had to wrap that ribbon around the whole shmear to get it to stay.

Also, I didn't intend for it to be rectangular. It just made up its own mine on that score. And it has the hole where I drew the final stitches together. Maybe I should felt it again, but for now, here's the finished product. I thought it would be nice for holding little soaps or something in a bathroom.

A Felted Box, Part One


I had such great hopes for this Steadfast Fibres wool in a beautiful icy blue. I had two skeins, and I used one to knit a big floppy "box" with a double strand for felting. I love the decreases on the bottom - now let's see what happens after the wash! More later.....

Wednesday, December 06, 2006

Dishcloth Duncery


I give up. What is it? It it a horse? I thought it might be a sleigh, but now I'm pretty sure it's a horse.

I joined the Monthly Dishcloth KAL , not so much because I use dishcloths (because I don't) or washcloths (because I don't) but to fool with the patterns and have some warm-up knitting available. I found out that I actually like knitting with Sugar 'n Cream. And that I have to hold my dishcloths at many different angles to discern a recognizable design.

It's also cool that the pattern comes to me in just a few lines every day - you get to see your dishcloth evolve into something over time - you don't know where it's going. Or in my case, you don't know where it ended up.

Saturday, December 02, 2006

I Felted!


Behold my first successfully (and intentionally) felted object - Fuzzyfeet! A long time ago I tried felting another project in my Calypso-action washing machine to no avail, but I didn't know what I was doing enough to pull it off and I blamed the washing machine. This time it worked - and now my need to felt is ever stronger. What's next? Bowls? Boxes? More Fuzzyfeet? Who knows.

The yarn was Lamb's Pride in a pink....I had to use a little over a skein for Noni's slippers. Those are her feet, molding the damp finished project into its custom-fit glory, rolled cuffs and all. You know she likes them cuz she's wearing them even though they're pink and making her feet freeze at the moment.